How to Plant & Grow Seed Potatoes

To me, all homegrown vegetables taste better than store bought. A few, however, taste so much better homegrown that I almost never bother buying them from the store. Tomatoes, eggplant, broccoli and cucumbers all fall into this category. I never thought that potatoes would be included until I finally grew them at home for the first time five years ago. A spud was a spud, I assumed, and they were so inexpensive in the grocery store anyways. The whole process of growing and “hilling” potatoes also intimidated me.

Indeed, I was wrong. I grew Red Pontiacs that first year and have ever since. Garden-fresh potatoes are so creamy and smooth, they truly taste as if they’ve already been buttered-up for you. My favorite recipe for them includes fresh garden sage leaves, and is so simple, easy and delicious, it has become one of my favorite dishes. I love this recipe so much; I tried making it after I ran out of potatoes one year and substituted them with store-bought. Well I learned my lesson. The homegrown potatoes were what made the dish so delicious. Those grocery spuds tasted like wax in comparison. How disappointing.

Potatoes are also pretty easy to grow. Here in Tallahassee they are traditionally planted around Valentine’s Day, and harvested by May. My friends Katie and Aaron, who run Full Earth Farm in Quincy, have a traditional Valentines Potato-date every February.

IMG_2589+copy.png
growing-potatoes

PLANTING METHOD

SEED: You’ll start with seed potatoes, which are just small potatoes that are disease-free and ready to plant. I recommend purchasing these seed potatoes from a local nursery; grocery bought potatoes are treated with a growth inhibitor and may carry disease. Cut these whole seed potatoes into pieces with one or two eyes, each cut piece being golf-ball size or larger. Although small potatoes need not be cut. Let these pieces dry overnight before planting to reduce the likelihood of rot.

SOIL: Potatoes like loose soil rich in organic matter, so work finished home compost or mushroom compost into your bed. There are many ways to plant potatoes, but the easiest and most reliable method I’ve found is as follows; Loosen up soil in your bed and remove any weeds. Make a trench 10 inches wide and 4 inches deep on level ground. If you have multiple rows, they should be at least 36 inches apart. If you haven’t already worked compost into the bed, you can add a layer of compost to the bottom of the trench. Use only finished mature compost that has completely broken down.

PLANTING: Drop potato pieces into the trench about 12 inches apart and bury 3-4 inches deep. If you want to increase the size of your harvest, you can “hill up” the potatoes once the foliage has reached 6-8 inches tall. This means you would pull soil up around the base of the plants, leaving 4 inches of the plant above soil level. Be careful not to damage the roots of the plants. Hill a second time 2-3 weeks later if your desire. Mulch with pine or hay straw once you have finished hilling, to prevent weeds. Hilling the soil increases potato production but is not necessary if you can’t find the time or inclination. I still get a good size harvest on years I haven’t had the time to hill.

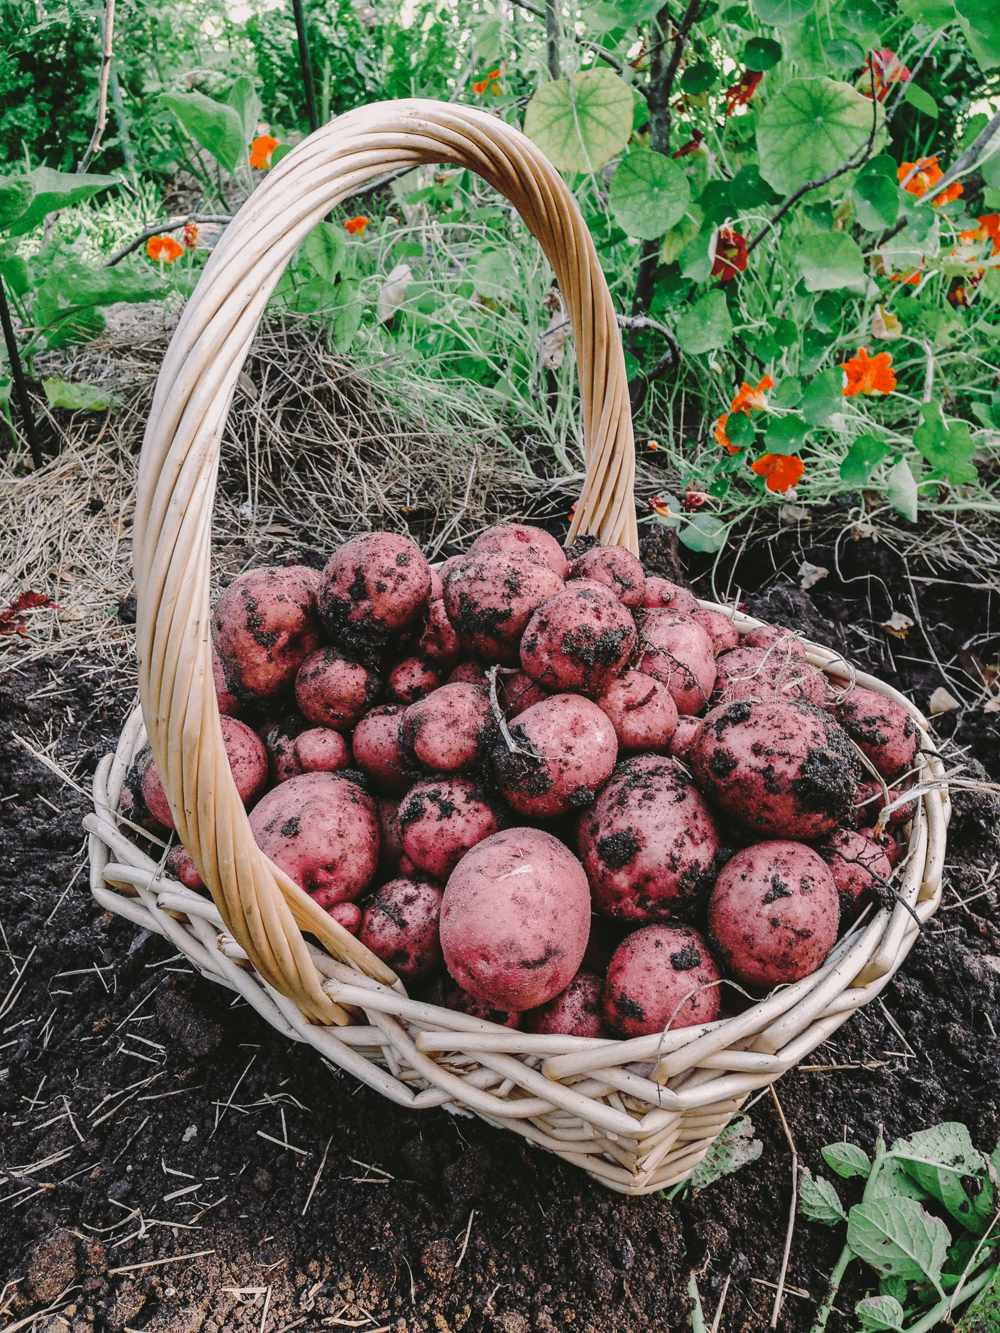
By the end of April, the green tops will start yellowing and dying back and that means those little taters are sizing up underground. I use a garden fork to lift up the tubers with the least amount of damage. This is my favorite part of the growing process, because it feels like you’re digging up buried treasure. Now all there's left to do is harvest and set a potato date!

Garden to Table: Rainbow Chard, Sweet Potato, Lentil & Sage Soup

Reasons to grow Swiss Chard!

1. Chard is super-easy to grow, making it an ideal choice for beginning gardeners–it thrives even in poor soil and will still produce in partial shade!

2. It’s pretty! Those bright stalks and shiny ribbed leaves look right at home in a flower border.

3. It’s good for you! A one-cup serving of boiled chard provides vitamins K, A, E, C, Magnesium, Potassium, Iron and a load of fiber. 

4. Chard offers a variety of preparation options–from salads to cooked dishes. And makes a terrific stand-in for spinach.

Here is a hearty and delicious winter soup for you to test out in the kitchen!

INGREDIENTS:

VEGETABLE STOCK:
8 cups of water
1 sweet potato, diced into 1 inch cubes
3 carrots, chopped
2 celery stalks, chopped
2 knuckles of ginger
1 yellow onion
2-3 bay leaves
3-4 sage leaves, chopped
Salt

ADDITIONAL:
Lentils
Rainbow Chard, greens and stems chopped

METHOD:

1. Boil 8 cups of water in a large pot. Add all the vegetable stock ingredients, cover with lid and reduce heat to simmer for 40 minutes until the broth tastes flavorful.

2. Meanwhile cook the lentils. About 1 cup of lentils to three cups of water should do the trick.

3. When the vegetable stock is done, fish out the bay leaves and pour into a blender or use an immersion blender until smooth. Add more water if the soup is too thick for your liking. Then add the soup to your lentils along with your chopped chard. Let simmer on medium-low for a few minutes until your greens are cooked. Garnish with sage and enjoy with a chunk of bread and drizzle of thick green olive oil.

YAUPON HOLLY: Wildlife Food AND Healthy Coffee Alternative

If you ever drive down to St. Marks Wildlife Refuge during the winter months, it’s hard not to notice the Yaupon holly, Ilex vomitoria. The bright, cherry-red berries provide a shock of color along the roadsides in the otherwise dull winter landscape.

The shrubs are less noticeable the rest of the year with their small, oval, dark evergreen leaves. Their dense and shrubby evergreen growth make them ideal for screens or hedges while also providing habitat for songbirds and other wildlife.

Yaupons are easy to grow, salt-tolerant, and reach 20 to 25 feet tall. They tolerate full sun to shade, but produce more berries in full sun. The weeping variety has down-turned branches and a beautiful shape that makes a stunning show when planted alone as a specimen plant. I planted one by my garden gate last year.

I love the shape of the weeping Yaupon and I love to use the red-berried branches for holiday decorating, but I didn't just plant it for aesthetic reasons. As a native plant, Yaupon holly has an ecological role to play as a functioning member of our local ecosystems. Pollinators flock to its masses of tiny white flowers in spring, and birds eat the berries that follow the flowers. Most importantly, our native insects feed on these plants they have evolved with, providing protein rich meals (in the form of themselves) for birds and other wildlife.

The wildlife, however, are not the only ones eating it. The prime reason I planted my Yaupon was for its caffeine rich leaves. By weight, the leaves contain more caffeine than both coffee beans and green tea —the highest caffeine content of any plant native to North America. Yaupon holly is also high in antioxidants and less bitter than green tea. It is a close cousin of the South American yerba maté (Ilex paraguariensis) and its tea is similar in flavor and quality.

Yaupon holly tea has been historically used by Native American tribes for both recreation and ceremony. Early white settlers knew the tea as "the black drink." The Seminoles used it ceremonially, boiling it to excess and drinking it to excess, causing vomiting and diarrhea which they felt was purifying. This is where the name Ilex vomitoria originates from. When brewed lightly, however, as you would any other tea, it is pleasant and harmless. During the Civil War, Southerners substituted Yaupon holly tea for coffee and black tea.

Leaves and stems of Yaupon holly may be used fresh, dried or roasted and stored like any dried herbal tea. They were traditionally parched to a dark brown over a fire. I follow the recipe taught to me by St. Marks Ranger Scott Davis, an experienced wild food forager. It is extremely important you positively identify the plant you harvest as Ilex vomitoria; if you are at all unsure, consult an expert.

Yaupon Holly Tea

Recipe by Scott Davis

1. Collect younger leaves and new twigs. Though older green leaves are usable, they contain smaller concentrations of caffeine. To harvest leaves from older stems, grasp the stem near the trunk and slide the hand outward to strip off the leaves.

2. Allow to dry, or dehydrate for quicker results.

3. Bake leaves (to activate caffeine) at 300 degrees for 8 minutes. Baking longer will produce a black tea variety, as opposed to a less-oxidized green tea.

4. Options: Dicing the leaves (with a knife or blender) prior to steeping will enhance caffeine activation. Add other ingredients at this point if you like, such as mint leaves. I love yaupon & mint tea.

5. Steep in hot water for a few minutes, then strain out the leaves. I like to use my French press, but you could also run it through a coffee machine (1 tablespoon = 1 cup).